How to Use Crimp Connectors: A Complete Wire Terminal Guide
Aug 4,2025
Introduction: Every time you fix an electrical appliance or wire up a car stereo, you’re likely relying on the humble crimp connector to hold things together.
These small crimp wire connectors create secure electrical joins without the need for solder. They save time and ensure reliability – keeping your car’s headlights shining and your home’s appliances running safely.
But what exactly is a crimp connector, and how do you use one properly? In this guide, we’ll explore the ins and outs of crimp connectors: what they are, the different types of crimpable connectors, how to crimp wires correctly, and tips for choosing the right connector for your needs.
What is a Crimp Connector?
A crimp connector (sometimes called a crimp-on connector or wire terminal crimp connector) is a metal fitting used to join electrical wires by tightly compressing around a stripped wire end. The crimping process (using a special tool) deforms the connector onto the wire, creating a strong conductive bond.
Crimp connectors come in many shapes and sizes – from tiny pins in computer cables to heavy-duty lugs on car batteries. They are used in cars, boats, aircraft, electronics, and household wiring. By using a connector crimp method instead of soldering, you get a gas-tight connection that resists vibration and corrosion.
How Do Crimp Connectors Work?
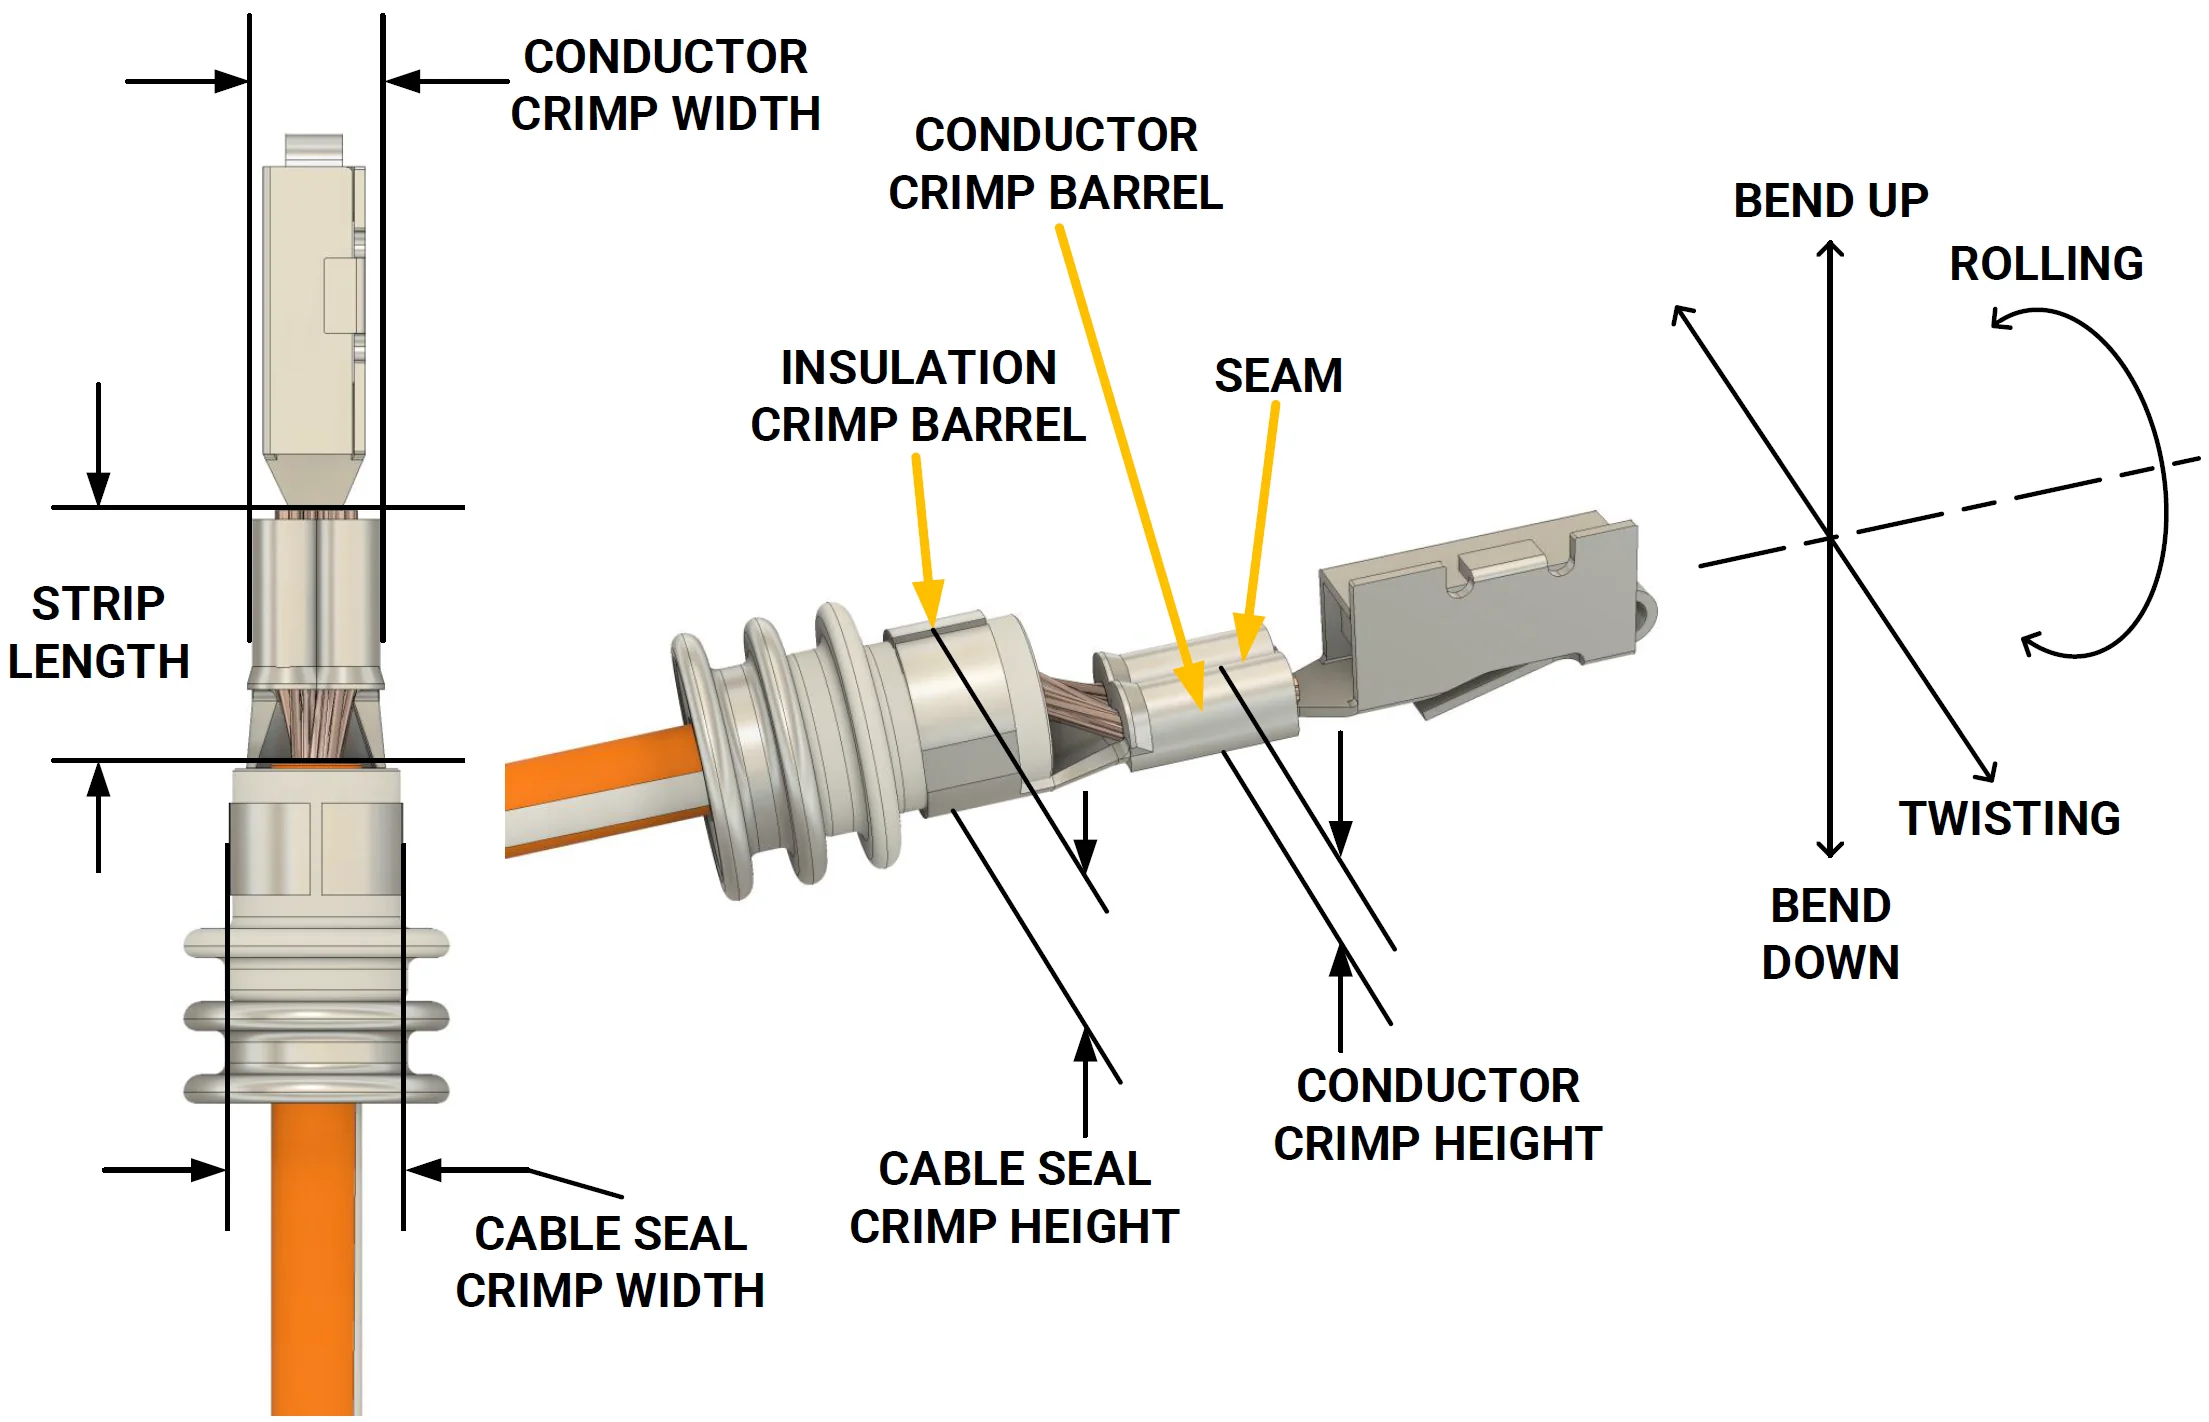
This image illustrates how crimp connectors mechanically deform around stripped wire ends using pressure to form a secure, conductive, vibration-resistant bond.
Crimp connectors work by essentially cold-welding the wire to the connector metal. When you squeeze a crimp connector around a stripped wire using a crimp connector tool (crimping pliers), the connector’s metal barrel deforms and grabs onto the wire strands. The result is a solid electrical and mechanical connection.
A correctly made crimp has very low resistance and is often more durable than a solder joint, especially in high-vibration environments.
Why use crimp connectors?
They provide a quick, consistent way to connect wires without heat.
For example, automotive manufacturers prefer crimping because it’s fast and avoids the risk of heat damage to components.
Crimp connections are also common in aerospace and industrial settings for their reliability. With crimpable connectors, you can attach terminals to wires in seconds and trust that they will hold up under stress.
Common Types of Crimp Connectors
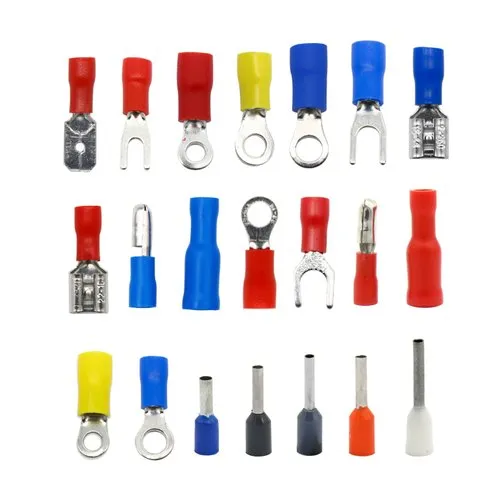
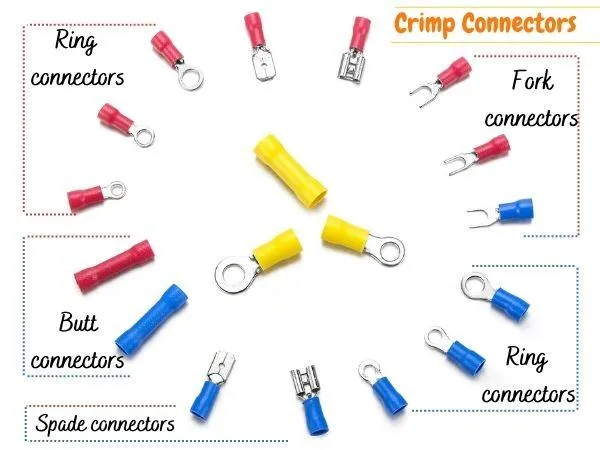
The graphic presents a lineup of popular crimp connectors used in automotive and electrical applications, including ring, spade, bullet, butt splice, and closed-end caps.
Crimp connectors come in several varieties, each designed for specific purposes. Here are some of the most common wire crimp connector types and their typical uses:
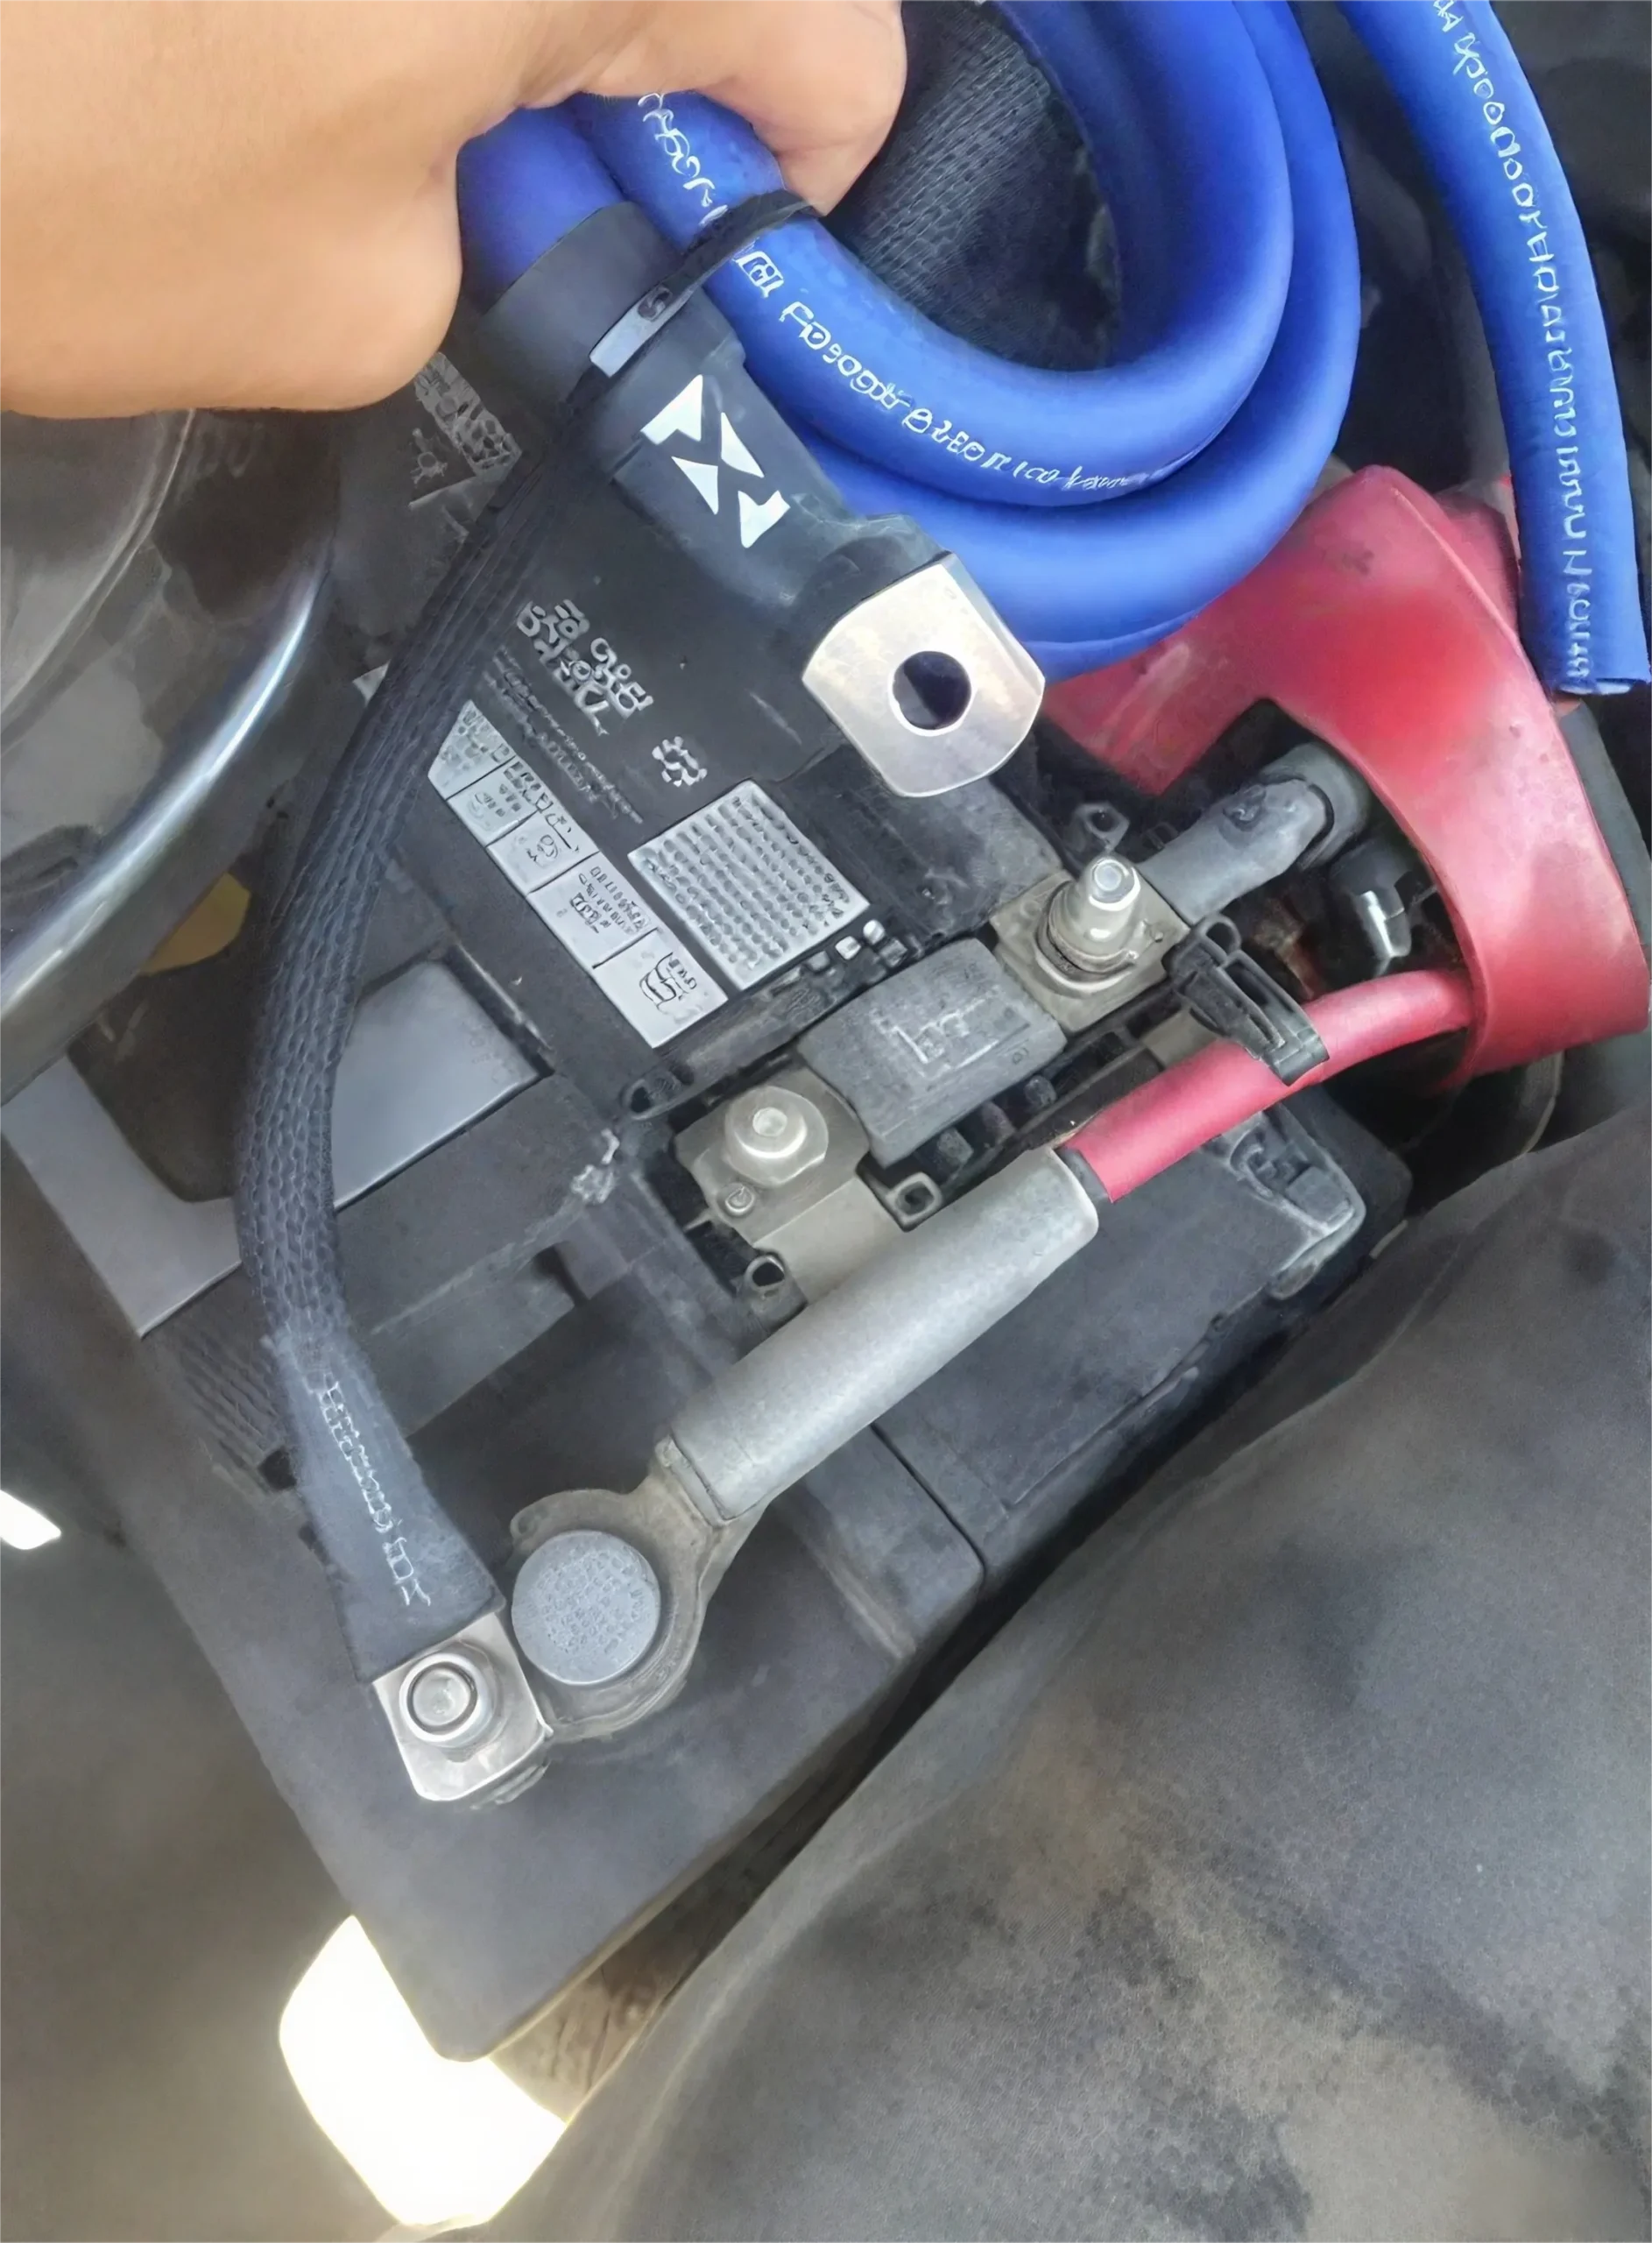
Ring terminals offer a secure and permanent connection, often used in battery terminals or grounding where a bolt or screw holds the terminal firmly in place.
- Butt Splice Connectors: These are cylindrical pieces that join two wires end-to-end. You insert a stripped wire into each end of the metal tube and crimp to splice them together. Butt splices are great for quick wire repairs or extensions.
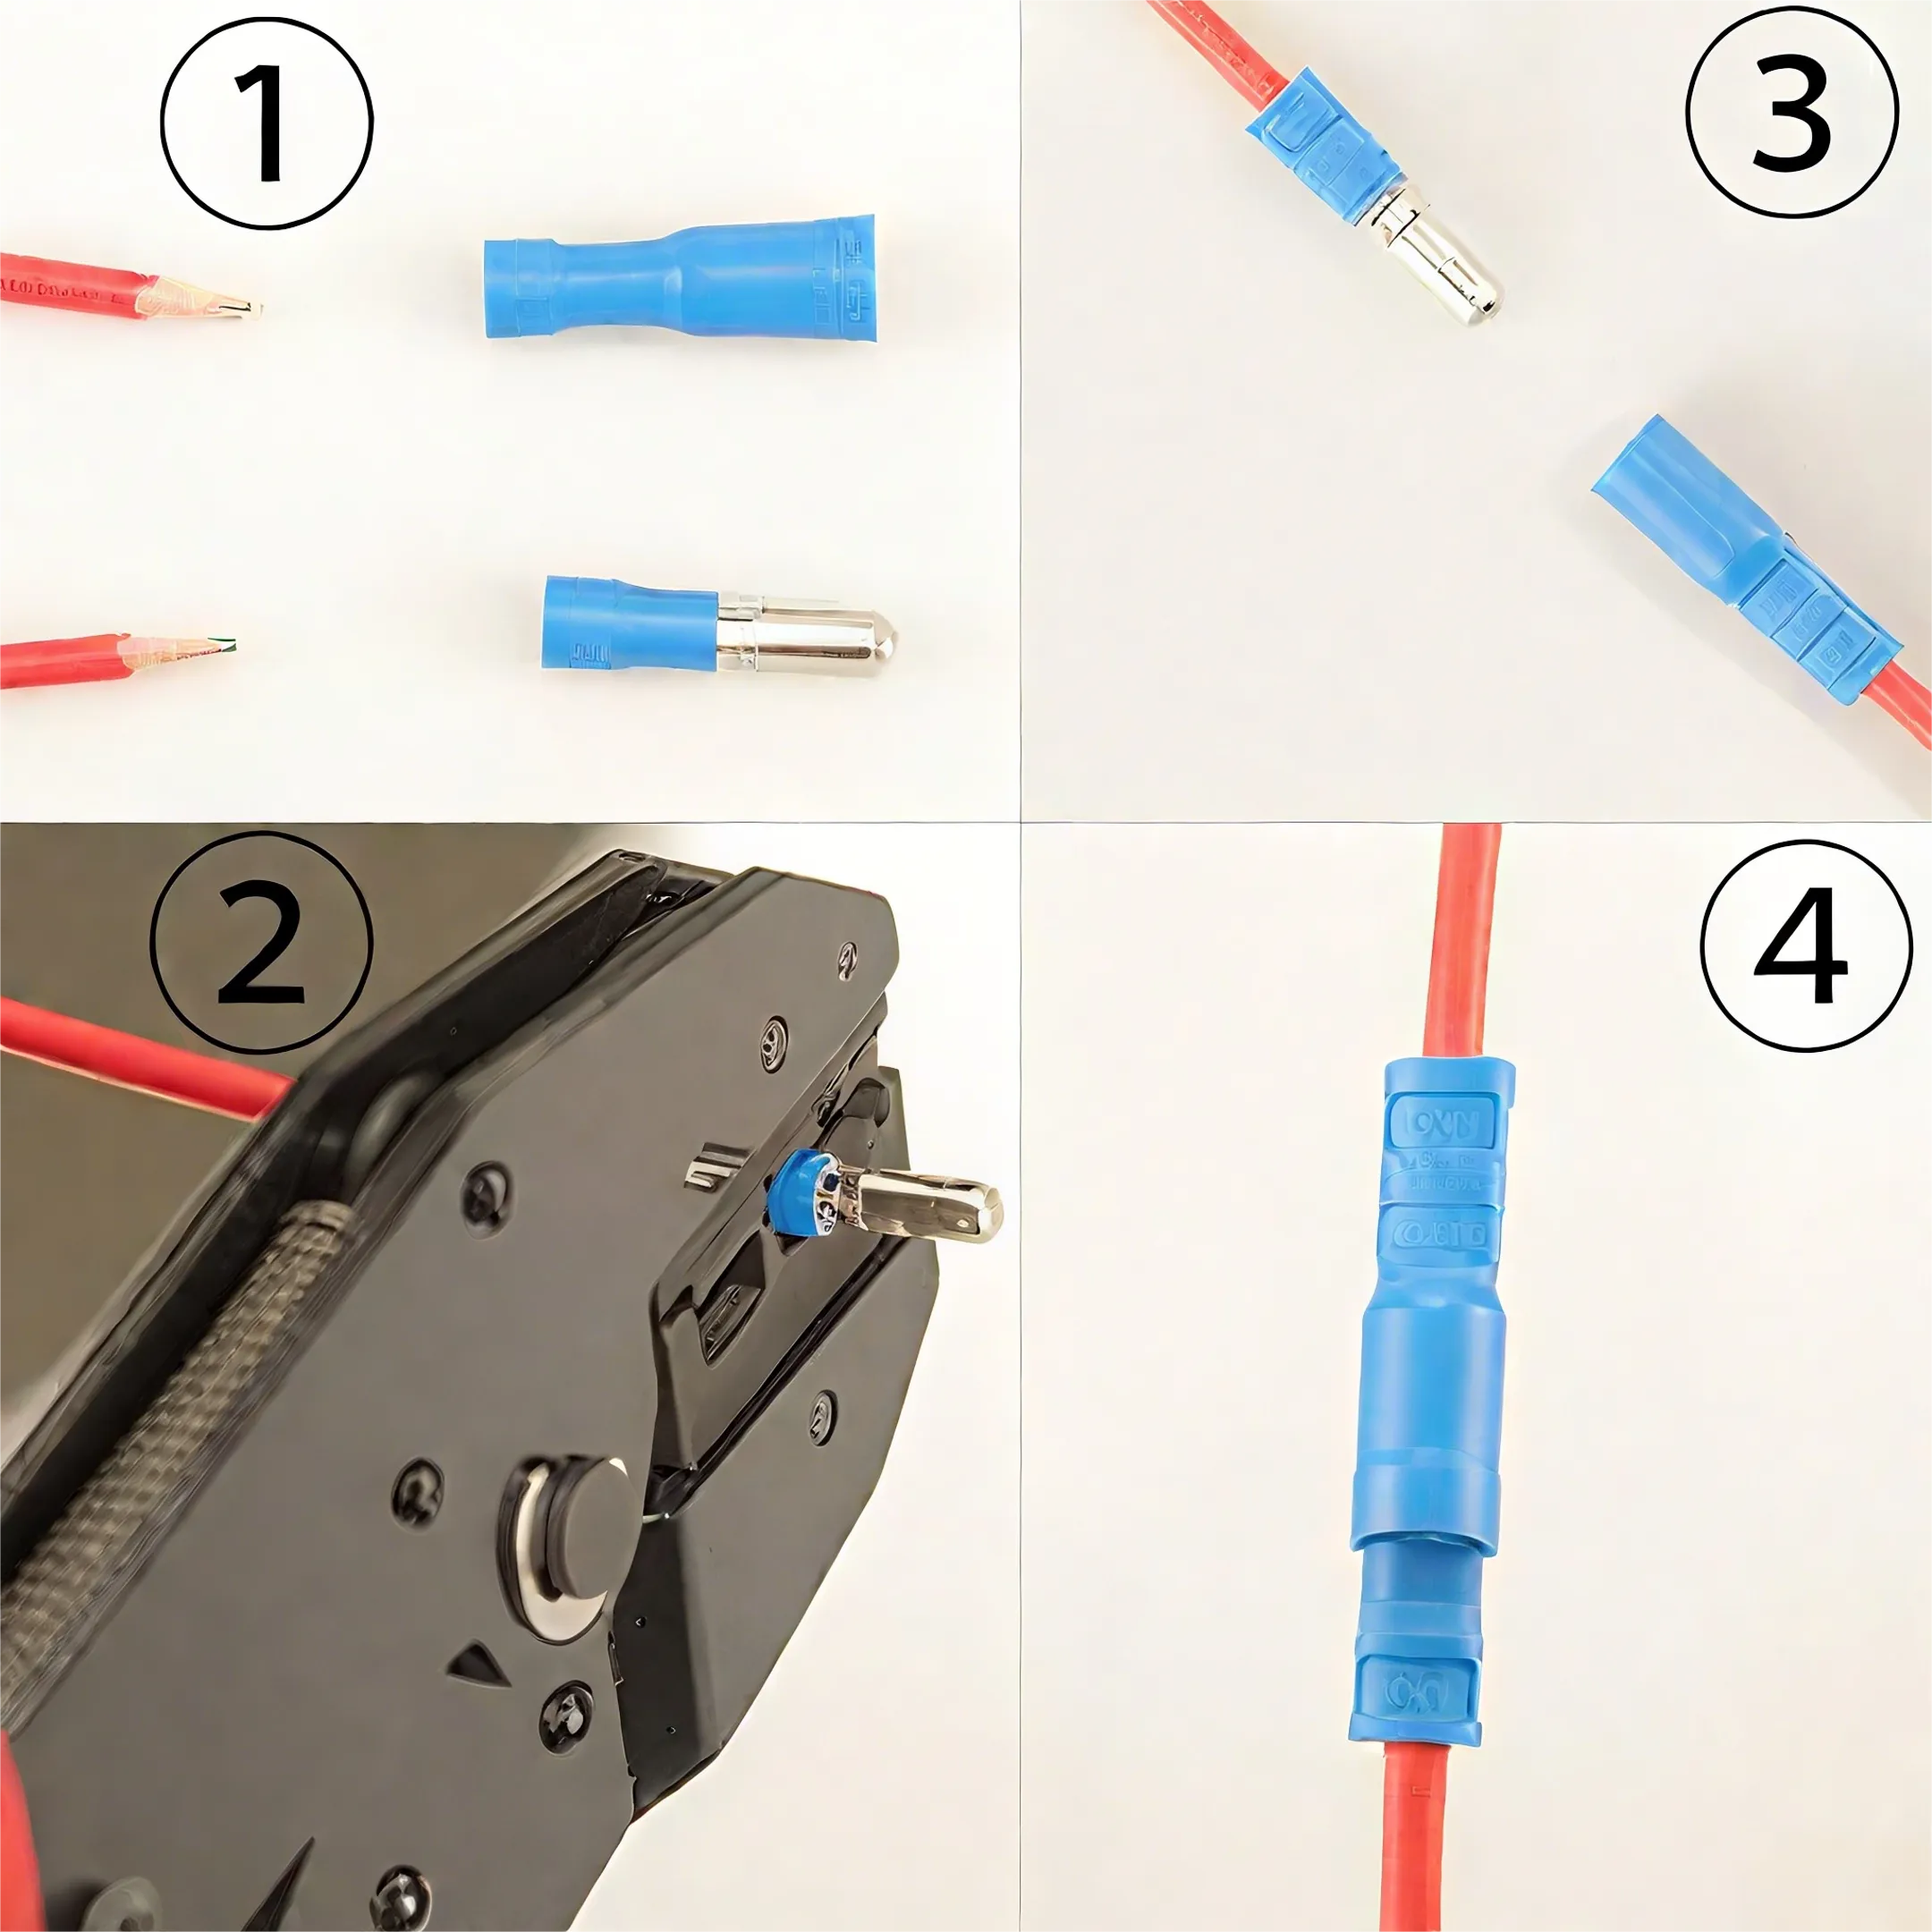
Spade and fork terminals allow easy installation and removal of wires in terminal blocks without fully removing screws—ideal for control panels or car fuses.
- Ring Terminals: These have a ring-shaped end that can be bolted or screwed to a post. The other end crimps onto a wire. Ring terminals are commonly used for grounding or connecting to battery terminals, since the ring lug is secured under a bolt and won’t pull off.
- Spade/Fork Terminals: These have a forked end that slides under a screw head without fully removing the screw. You crimp the other end to a wire. Spade connectors make it easy to attach or remove a wire from a terminal block or screw terminal.
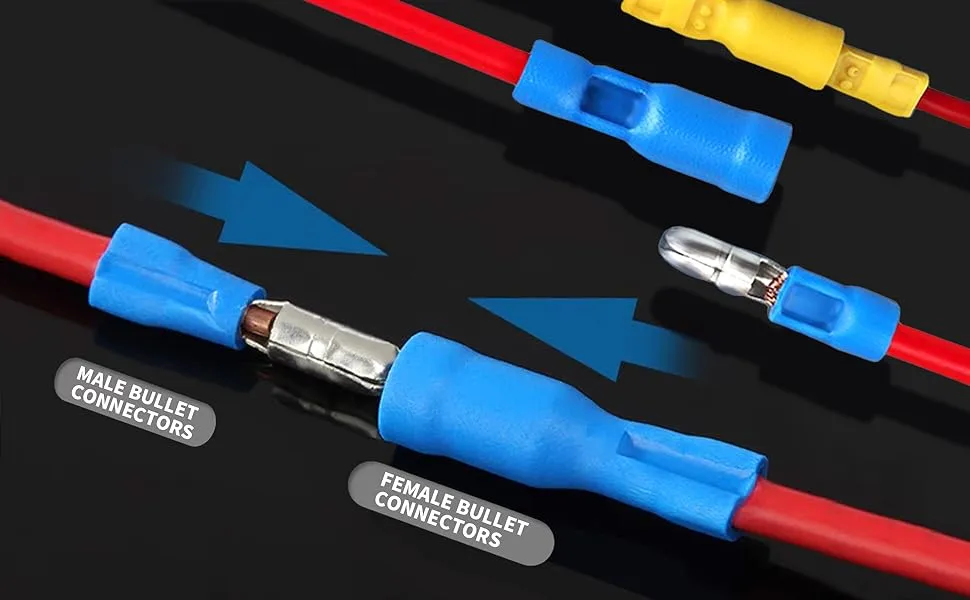
Bullet connectors consist of round male and female terminals that snap together, making them ideal for removable car or motorcycle wiring.
- Bullet Connectors: These come as male/female pairs of round connectors that snap together. Each side is crimped to a wire, allowing for a quick disconnect. Bullet connectors are common in motorcycle and car wiring for easily unplugging accessories or components.
- Quick-Disconnect Blade Terminals: Flat blade-style male and female connectors (often just called spade connectors) that slide together to connect. They are common in appliances and vehicle wiring and let you disconnect wires without cutting them.
- Closed-End Connectors (Crimp Caps): These join multiple wires inside one insulated cap. You insert the stripped ends of several wires into the cap and crimp it. Closed-end connectors provide a quick way to tie several wires together (for example, in a light fixture).
- Insulated Connectors: These have a colored plastic sleeve (usually red, blue, or yellow) over the metal. The insulation prevents shorts, and the color indicates the wire size it fits (red = small, blue = medium, yellow = large gauge).
- Non-Insulated Connectors: These are plain metal connectors with no plastic sleeve. They are used when insulation isn’t needed or when you’ll add insulation later (for example, with heat-shrink tubing after crimping).
Crimp connectors are used in many industries.
For instance, automotive crimp connectors often have features like waterproof seals or heat-shrink insulation to survive harsh conditions in a car. Small wire crimp connectors exist for fine electronics wiring.
Regardless of size or style, all crimp connectors work on the same basic principle: compressing a metal barrel around a wire to form a secure bond.
How to Properly Crimp Two Wires Together
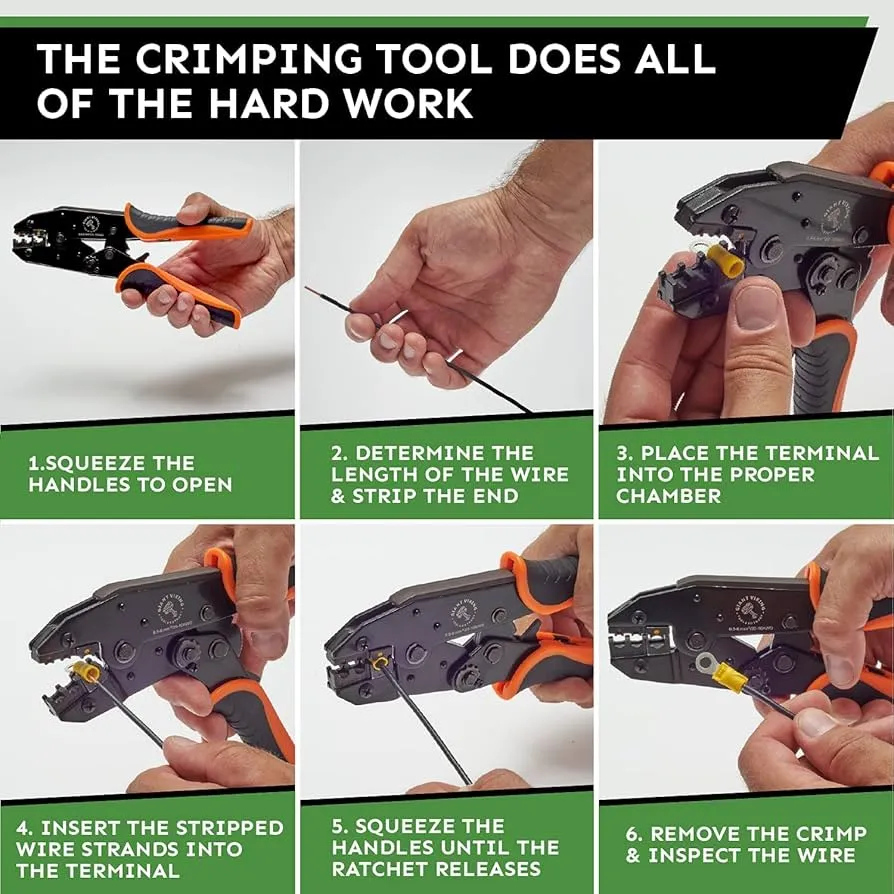
Demonstrates how to insert a wire into a terminal and apply even pressure using a professional crimping tool for reliable results.
Using crimp connectors is straightforward, but doing it correctly is crucial for safety and reliability. Follow these steps to use crimp connectors to connect wires securely:
- Prepare the Wires: Strip about 1/4 inch (6 mm) of insulation off the end of each wire using a proper wire stripper. Make sure you don’t nick or cut the metal strands. Keep the wire strands straight (do not pre-solder or “tin” the ends).
- Select the Right Connector: Choose a crimp connector that matches your wire’s gauge. For example, use a red connector for 22–16 AWG wires, blue for 16–14 AWG, and yellow for 12–10 AWG. If joining more than two wires, use a connector designed for multiple wires (like a larger butt splice or a crimp cap).
- Insert the Wire: Fully insert the stripped wire into the connector’s barrel so that no bare metal is exposed. In a butt splice, push the wire in until it hits the internal stop. In a ring or spade terminal, the wire should reach the end of the metal barrel.
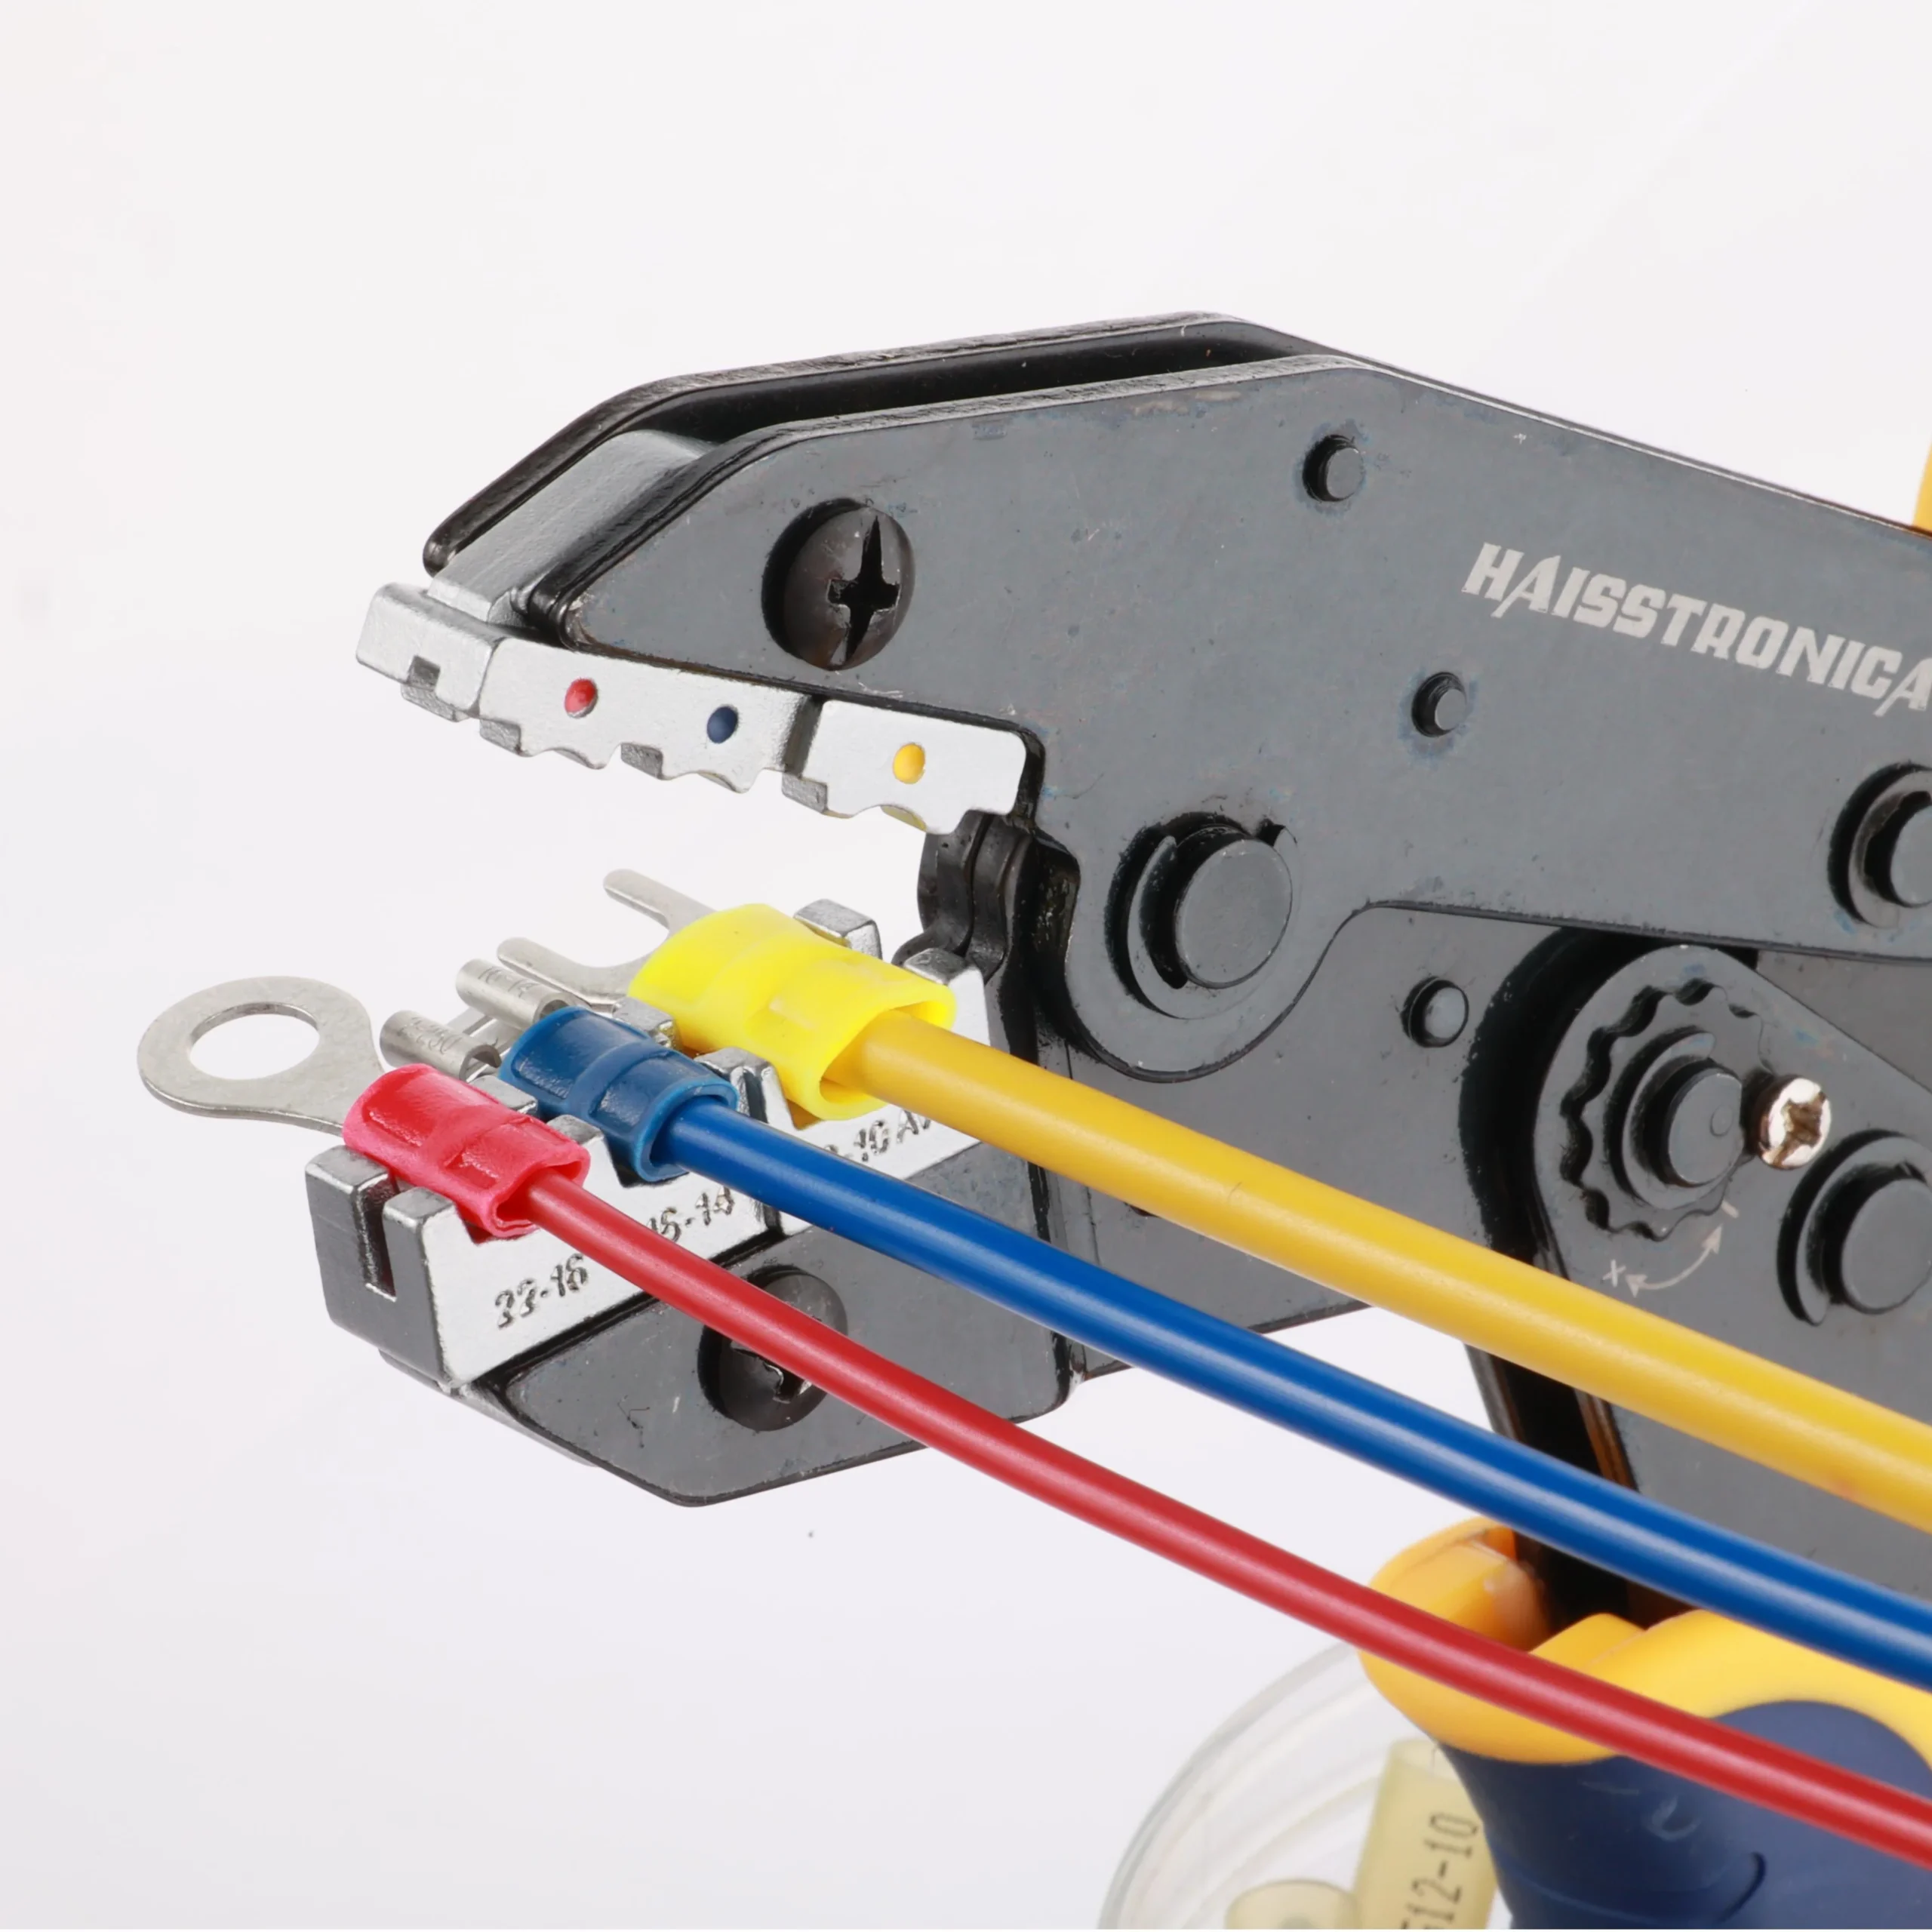
Demonstrates how to fully insert a stripped wire into a crimp connector barrel before compression. This step is critical to avoid exposed copper and to ensure maximum mechanical strength.
- Use a Crimping Tool: Place the connector into the crimping tool’s matching slot (by connector size or color). Squeeze the tool handles firmly to crimp the metal onto the wire. If you’re using a ratcheting crimper, it will release automatically after fully compressing the connector.
- Crimp Solidly (Once): A single, proper crimp is enough to secure the wire. Do not crimp the same connector twice, and avoid using the wrong tools (like pliers or a hammer) which can deform the connector. One consistent squeeze with a crimp tool is ideal.
- Inspect and Test: Give the wire a gentle tug to make sure it’s locked in place. It should not pull out. Inspect the crimp – for insulated connectors, you should see the plastic sleeve indented by the crimper; for non-insulated, the metal barrel should be tightly compressed around the wire with no strands sticking out.
- Seal if Needed: If your connector has a heat-shrink sleeve or if you want extra protection, use a heat gun to shrink the insulation after crimping. This provides a waterproof seal and strain relief, which is important for automotive or marine connections.
Following these steps will help you get a safe, durable connection every time. Proper technique and the right tool are essential for a low-resistance crimp that won’t slip or fail under load.
Crimp Connectors vs. Soldering: Which Is Better?
A common question is whether using crimp connectors is better than soldering wires together. The answer depends on the situation, but crimping offers several advantages:
- Ease and Speed: Crimping is fast – a connection takes only seconds with the right tool. Soldering is slower because you have to heat up a soldering iron and carefully melt solder onto the wire.
- Consistency: Crimping with a quality tool gives uniform results. Solder joints can vary with the skill of the person doing them. Crimping ensures each connection is made with the same pressure and method every time.
- Mechanical Strength: A proper crimp is robust and holds up well to vibration. In contrast, soldered joints can become brittle over time. Solder can wick into wire strands and create a stiff section that might crack under constant flexing or vibration.
- Electrical Performance: Both methods create a low-resistance connection when done correctly. A good crimp is gas-tight, and a good solder joint is similarly conductive. Neither has a major advantage in conductivity if properly done. Problems only arise if the crimp or solder joint is poorly made.
- Tools and Skill: Soldering requires an iron, solder, and technique. Crimping requires a specialized crimp tool and matching connectors, but it’s generally easier for beginners to get right.
For many wiring jobs, crimping is preferred in practice. In automotive and industrial use, crimped connections are highly reliable under harsh conditions and quick to make. They resist vibration and eliminate the need for heat during assembly.
Are crimp connectors better than soldering?
In these contexts, yes. Soldering still has its place (for example, on circuit boards or small electronic projects). However, for joining wires or adding terminals in a vehicle or appliance, a properly done crimp is usually the better choice for durability and efficiency.
Choosing the Right Crimp Connector and Tool
Not all crimp connectors are created equal. Here are some tips for selecting the right connector and using the right tools:
- Match Connector to Wire Gauge: Use a connector that matches the wire’s size (AWG). Connectors are often color-coded or labeled by gauge: red connectors fit 22–16 AWG, blue connectors fit 16–14 AWG, and yellow connectors fit 12–10 AWG.
- Choose the Correct Type: Pick a connector style suited to your task. To join two wires end-to-end, use a butt splice. To attach a wire to a screw post, use a ring or fork terminal. Need a removable connection? Use bullet or blade connectors. To join multiple wires, use a crimp cap (closed-end connector).
- Insulated or Non-Insulated: If there’s any chance of the connection touching other wires or metal, go with insulated connectors to prevent shorts. If the connection is enclosed or you’ll insulate it yourself after, non-insulated connectors (plain metal) can be used.
- Quality Matters: Use good-quality connectors made from conductive metal (like tinned copper) and ideally UL listed. Cheap, thin metal connectors can fail or corrode over time. Likewise, invest in a decent crimping tool (a ratcheting tool is ideal) for consistent pressure. Avoid crimping with regular pliers, as they won’t apply even force.
- Special Environments: Consider where the connection will be used. If it’s exposed to water, weather, or engine heat, choose connectors with protective features. For example, use heat-shrink insulated crimps for marine or outdoor applications. In high-vibration areas, make sure connectors latch or are secured so they don’t come apart over time.
- Voltage and Current: Make sure your connectors are rated for the voltage and amperage of your project. For 120V AC household wiring, use UL-listed insulated crimp connectors designed for that voltage and current. Also ensure the connector’s current rating matches your circuit to prevent overheating.
Below is a quick reference chart for common insulated crimp connector colors and the wire sizes they fit:
| Connector Color | Wire Size (AWG) | Typical Uses |
|---|---|---|
| Red | 22–16 AWG | Small electronics, light-duty automotive wires |
| Blue | 16–14 AWG | Car audio, general automotive wiring, appliances |
| Yellow | 12–10 AWG | Heavy-duty automotive, marine, or household wire joins |
| Other colors | Various (e.g. Pink 26–22 AWG, Black 8 AWG, etc.) | Special sizes (very small or very large wires) |
This color chart helps identify wire gauge compatibility: red (22–16 AWG), blue (16–14 AWG), yellow (12–10 AWG).
(Table: Common crimp connector color codes and the corresponding wire gauge ranges.)
Using the color code, you can quickly pick the right connector size by its sleeve color. For instance, a 14 AWG wire would use a blue connector, an 18 AWG wire uses red, and a 10 AWG wire uses yellow.
Frequently Asked Questions (FAQ) About Crimp Connectors
Q1: What are the two types of crimp connectors?
Crimp connectors generally come in two design styles: open-barrel and closed-barrel. Open-barrel connectors have a U-shaped crimp section (often used for automotive plug pins or small PCB pins). Closed-barrel connectors have a fully enclosed barrel (like on a butt splice or a ring terminal). Both styles secure a wire by crimping, just in different shapes.
Q2: What do you call the wire connectors that you crimp?
Typically, they’re just called crimp connectors or crimp terminals. People might refer to them by specific names (butt connectors, crimp caps, lugs, etc.), but if it attaches by crimping, it’s a crimp connector. Essentially, any wire connectors crimp onto a conductor would fall into this category.
Q3: How do you use a crimp connector?
Strip the wire, insert the bare end into the connector, and use a crimping tool to compress the connector around the wire. Make sure you have the right size connector for the wire gauge. After crimping, give it a gentle tug to ensure it’s secure.
Q4: Can I crimp without a crimper tool?
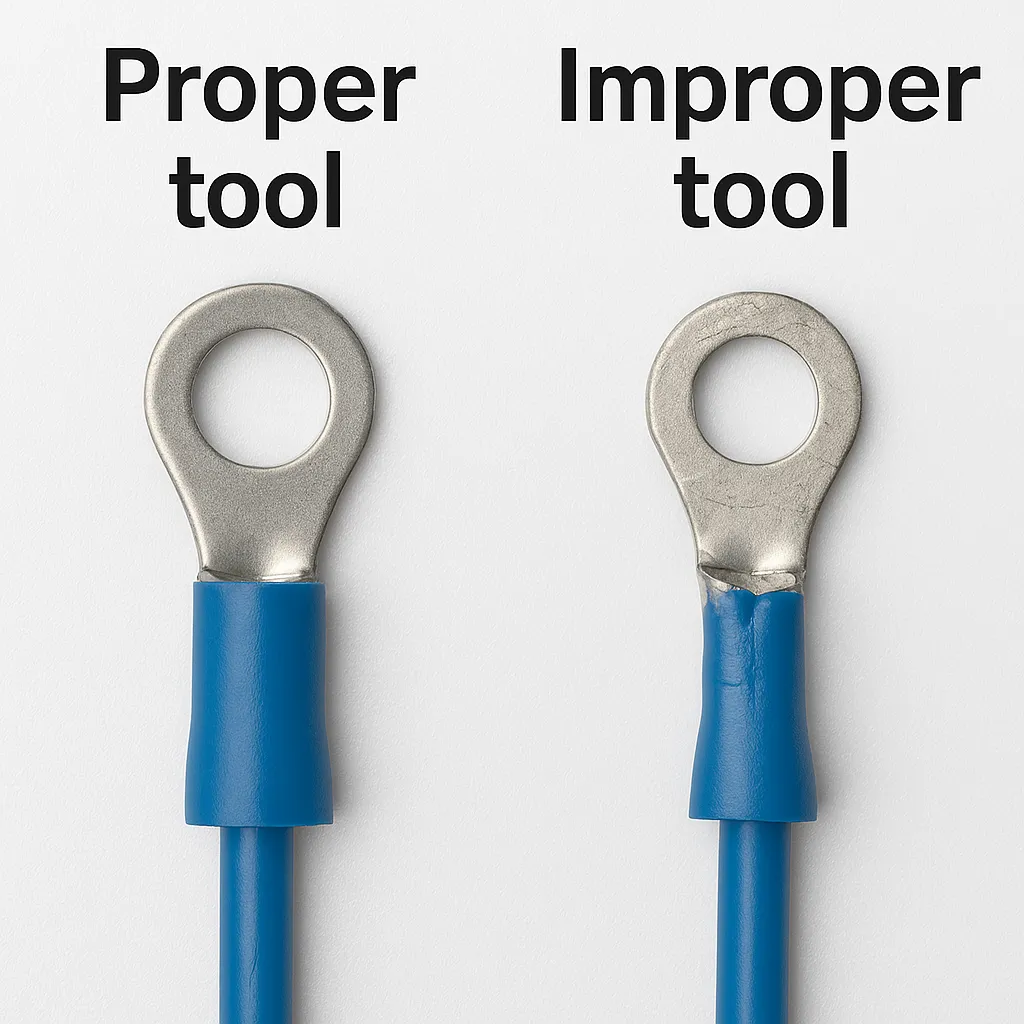
This side-by-side view compares professionally crimped terminals using proper tools with those crimped using pliers, highlighting quality differences.
No – it’s not advisable. If you try to use pliers or a hammer to crimp, you’ll likely get a weak connection. Without the even pressure of a proper crimp tool, the connector won’t bond well to the wire. This can lead to a loose or high-resistance connection. Always use a crimping tool for reliable results.
Q5: What is the difference between red and blue crimp connectors?
Mainly the wire size each is made for. Red insulated crimp connectors fit smaller gauge wires (around 22–16 AWG), while blue connectors fit mid-size wires (16–14 AWG). Yellow connectors (the next larger size) handle about 12–10 AWG wires. The color is a quick guide to the connector’s size and the wire range it supports.
Q6: Are crimp connectors better than soldering?
For many uses, yes. Crimped connections hold up better under vibration and are faster to execute. That’s why they’re common in cars and airplanes. Soldering is fine for some cases (like on circuit boards or small electronic repairs). But for joining wires or attaching terminals in a vehicle or appliance, a well-done crimp is usually more durable and consistent than a soldered connection.
Q7: Can I put two wires in one crimp connector?
Not with a standard connector, unless it’s specifically designed for it. Most crimp connectors are intended for one wire per end. Trying to fit two wires into one crimp often results in a poor connection. If you need to connect multiple wires together, use a connector made for that – for example, a crimp cap that can hold several wires, or a larger butt splice that can handle the combined wire size.
Q8: Should you twist wires together before crimping?
You generally don’t need to twist stranded wires together tightly before crimping. In fact, over-twisting can prevent the connector from crimping evenly on all strands. It’s okay to straighten the strands or give a slight twist just to help get the wire into the connector, but don’t overdo it. The crimp will grab all the strands securely without pre-twisting.
Q9: Can crimp connectors be used on 120V house wiring?
Yes, as long as the crimp connector is rated for the application. Many appliances use crimped terminals on 120V wires internally. If you use crimp connectors in household wiring, choose insulated ones that are UL-rated and enclose the connection in an electrical box like any other wire splice. A properly crimped, insulated connector can safely carry 120V AC.
Crimp connectors are a fantastic solution for making quick, secure electrical connections. By understanding what crimp connectors are used for and following these best practices, you can ensure every crimped joint in your project is safe and long-lasting.
Crimping is a skill worth mastering – with the right crimp connectors and tools, you’ll have confidence in each connection you make. Whether you’re restoring a classic car’s wiring or setting up a home audio system, solid crimped connections will deliver reliable performance for years to come.
Bonfon Office Building, Longgang District, Shenzhen City, Guangdong Province, China

A China-based OEM/ODM RF communications supplier
Table of Contents
Owning your OEM/ODM/Private Label for Electronic Devices andComponents is now easier than ever.
